To create pricing table using Html and Css is as easy as creating a button. Every now and then we come across pricing tables in different websites and they are all responsive. For example, If you visit this link, you will see an example of a price list table
So our aim in this tutorial to learn to create a responsive pricing table using Html and Css.
We first need to create the Html structure
Step 1: creating the Html structure
We will create a very simple Html structure and you can modify it to suite your preference.
HTML

 <div class="main">
      <div class="pricing-table">
        <div class="pricing-column">
          <div class="pricing-header">
            <h2>Basic</h2>
            <p class="price">$9.99/month</p>
          </div>
          <ul class="features">
            <li>Feature 1</li>
            <li>Feature 2</li>
            <li>Feature 3</li>
          </ul>
          <a href="#" class="btn">Get Started</a>
        </div>
        <!-- Add more pricing columns as needed -->
      </div>
    </div>
Next Step : Add Css to Style The Price List Table
CSS

.main {
      padding: 1rem;
      width: 320px;
      height: 320px;
      margin: 20% auto;
      border: 8px solid rgb(101, 73, 2);
      border-right: 8px solid goldenrod;
      border-left: 8px solid goldenrod;
      border-bottom: 8px solid rgb(101, 73, 2);
      transition: all 0.5s linear;
    }
    .main:hover {
      padding: 0.5rem;
    }
    .pricing-table {
      display: flex;
      justify-content: center;
      align-items: flex-start;
      flex-wrap: wrap;
      border: 1px solid #ccc;
      background-color: #efecec;
      border-radius: 5px;
      /* box-shadow: 4px 4px 4px blue; */
      width: 100%;
      height: 100%;
      margin: 0 auto;
    }
    .pricing-column {
      /* margin: 10px; */
      padding: 20px;
      text-align: center;
    }
    .pricing-column:hover {
      margin: 0;
      /* transform: scale(100%); */
      width: 100%;
      /* background-color: #fff; */
    }
    .pricing-header {
      margin-bottom: 20px;
    }
    .pricing-header h2 {
      margin-bottom: 1rem;
      letter-spacing: 4px;
      text-decoration: underline;
    }
    .price {
      font-size: 24px;
      font-weight: bold;
    }
    .features {
      list-style: none;
      padding: 0;
      margin-bottom: 20px;
    }
    .features li {
      margin-bottom: 10px;
    }
    .btn {
      display: inline-block;
      padding: 10px 20px;
      background-color: #007bff;
      background-color: #535353;
      color: #fff;
      text-decoration: none;
      border-radius: 5px;
      transition: all 0.5s linear;
    }
    .btn:hover {
      border: 1px solid grey;
      color: black;
      background-color: #dbdada;
    }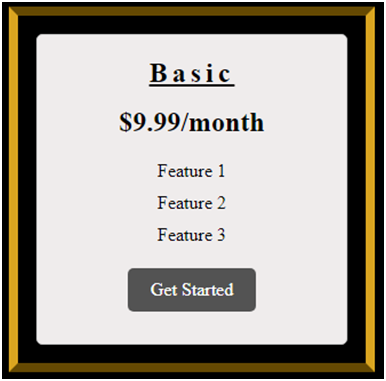
In this example, we have a container <div> with the class “pricing-table” that wraps the pricing columns. Each pricing column is represented by a <div> element with the class “pricing-column”.
Flex box is used to align the items in the pricing column properly.
Every other Css code added there are quite understandable.
You can add more pricing columns by duplicating the HTML structure inside the “pricing-table” container. Modify the CSS styles, container class name, and HTML structure as needed to suite your specific requirements.
If you want to check your html website online, you can learn how to host your Html website free online and share it with you friends.
You might have seen more beautify price list table, but hopefully this tutorial gives you a good idea to Create A Responsive Pricing Table Using Html And Css.