A modal is just like an advance tooltip; a modal shows you the content of the modal and also allows you click on the content of the modal. The tooltip will only show as long as you hover or focus in the tooltip element but the modal will always be open as long as it has not been closed. So, in this tutorial, we would be learning how to create a modal box using Html and Css. Below are the steps you can follow to create a modal box using Html and Css.
1. Set up the HTML structure
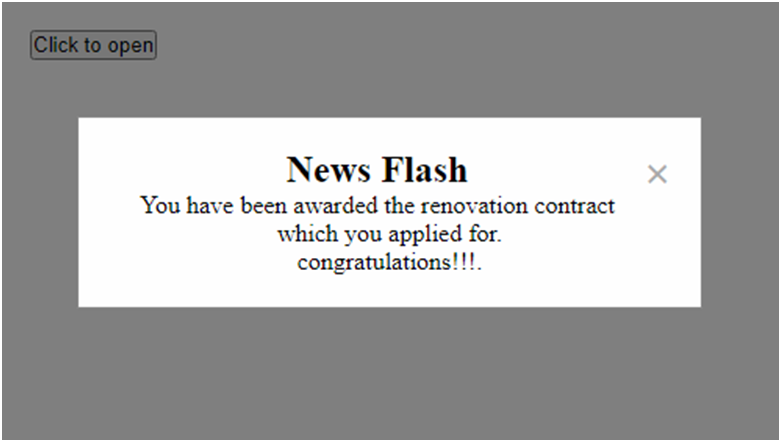
Here, we are creating the HTML structure for the modal box using <div> elements.
Html
<div class="modal">
<div class="modal-content">
<span class="close">×</span>
<h2>News Flash</h2>
<p>
You have been awarded the renovation contract which you applied for.
<br />congratulations!!!.
</p>
</div>
</div>
<button id="openModal">Click to open</button>
In this very example, the modal box is wrapped within a container div with a class name of “modal”.
Inside the container, there is a “modal-content” div that holds the actual content of the modal, including a close button (with the class “close”), a heading, and some text.
The “openModal” button is used to trigger the opening of the modal.

2. Add CSS Styles for The Modal Box
We then need to add CSS styles to position and style the modal box.
Css code

.modal {
  display: none;
  position: fixed;
  z-index: 1;
  left: 0;
  top: 0;
  width: 100%;
  height: 100%;
  overflow: auto;
  background-color: rgba(0, 0, 0, 0.5);
}
.modal-content {
  background-color: #fefefe;
  margin: 15% auto;
  padding: 20px;
  border: 1px solid #888;
  width: 80%;
  max-width: 600px;
  text-align: center;
}
.close {
  color: #aaa;
  float: right;
  font-size: 28px;
  font-weight: bold;
  cursor: pointer;
}
.close:hover,
.close:focus {
  color: black;
  text-decoration: none;
  cursor: pointer;
}
In this CSS code, the “.modal” class sets the modal container to be hidden initially (display: none;) and positions it as a fixed overlay (position: fixed;) covering the entire viewport. The background color is set to a semi-transparent black to create an overlay effect.
The “.modal-content” class styles the actual content of the modal. It sets the background color, margin, padding, border, and width. The modal is horizontally centered using margin: 15% auto; and limited to a maximum width of 600 pixels.
The “.close” class styles the close button within the modal. It sets the color, float value, font size, font weight, and cursor properties. When hovered or focused, the close button’s color and cursor properties are modified.
You can also learn how to create a tooltip using Html and Css
3. The next step is to add JavaScript to control the modal behavior
We would use JavaScript to handle the opening and closing of the modal box.
JavaScript

<script>
var modal = document.querySelector('.modal');
var openModalBtn = document.getElementById('openModal');
var closeModalBtn = document.querySelector('.close');
openModalBtn.addEventListener('click', function () {
  modal.style.display = 'block';
});
closeModalBtn.addEventListener('click', function () {
  modal.style.display = 'none';
});
If you observe JavaScript code closely, you would notice that the modal variable is used to reference the modal container element. The openModalBtn variable refers to the button element that triggers the modal’s opening, and the closeModalBtn variable refers to the close button within the modal.
The close and open functionality are triggered by the click event which is added using event listeners.
The event listeners are added to the “openModalBtn” and “closeModalBtn” elements. When the “openModalBtn” is clicked, the modal’s display is set to “block” and when the “closeModalBtn” is clicked, the modal display value will be set back to “none” which eventually makes it to be hidden.
Pingback: How to Create a Tooltip Using CSS - codeharis
Pingback: How to create a progress bar using HTML and CSS - codeharis
Pingback: Responsive Navbar using HTML and CSS? - codeharis
Pingback: How to Create a Parallax Scrolling Effect Using CSS - codeharis
Pingback: How To Create A Responsive Timeline In Html And Css - codeharis