Have you learnt about the before and after Css pseudo elements ? there are two main known Css pseudo elements namely;
- before
- after
well most of the time you might have used them but you don’t really know that’s a Css pseudo element. for example, when you want to begin a stylesheet, you might add the following line of code at the top
::before,::after{
margin: 0 ;
padding: 0 ;
}
just incase you don’t know what those three lines of code works for in Css, this is it;
::before{
margin: 0 ; //remove any pre-margin before all created element if there is any.
padding: 0 ;//remove any pre-padding before all created element if there is any.
}
This means, if there is any margin or padding before any element which you did not add, it should be removed.
Thesame thing works for the after pseudo element.
The Css pseudo element is not used for only removing pre-existing margin and padding alone, there are more use of the pseudo element and in the example below, we would try our hand on what we can do with the pseudo element.
Example on how to use before and after pseudo elements in Css
Html
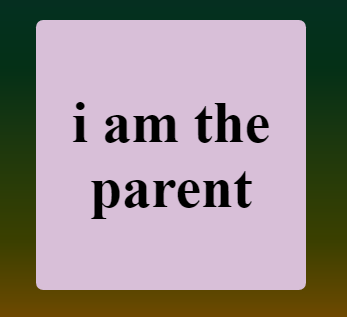
<div class="parent">
<h1>i am the parent</h1>
</div>
we would add a few styling to our element
CSS
.parent {
width: 300px;
height: 300px;
font-size: 2rem;
text-align: center;
background-color: thistle;
border-radius: 8px;
position: relative;
transition: all 1s linear;
}
Result
Using before pseudo element to add content before an element
For us to add a content before the element, we add the content from Css, not html.
And for we do do that, we will need to add the following code to our Css
CSS
.parent::before {
  width: 100%;
  height: 100%;
  text-align: center;
  position: absolute;
  background-color: tomato;
  top: -10%;
  left: -10%;
  border-radius: 8px;
  transition: all 1s ease;
}
When you add the Css, you will notice that your result is still the same, and you might be thinking maybe you have a bug or something, but that’s not the case.
You see, for you to add a content to the element you have created, you need to add the “content” property in Css. within the value, you can put whatever you want, like a simple text or you may even decide to leave it blank.
So lets add the “content” property and see what we get.
Css

.parent::before {
content : "i am the first child";
  width: 100%;
  height: 100%;
  text-align: center;
  position: absolute;
  background-color: tomato;
  top: -10%;
  left: -10%;
  border-radius: 8px;
  transition: all 1s ease;
}
your result should be like what’s shown in the picture below
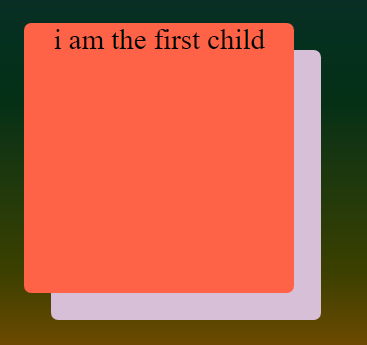
Notice there is now a new content in our document but it was not added in html.
One thing that may be bothering you at the moment might be why the content is covering the parent ?
Ok, this happens because, the new element is added “before” the other one, so it has a higher z-index value.
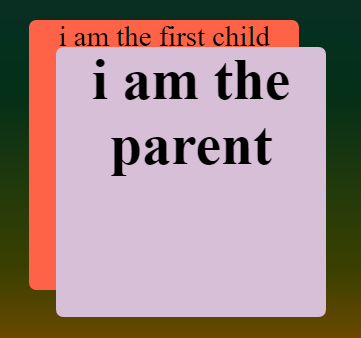
If you doubt, let’s change the Z-index values.
CSS

.parent::before {
  content: 'i am the first child';
  width: 100%;
  height: 100%;
  text-align: center;
  position: absolute;
  background-color: tomato;
  top: -10%;
  left: -10%;
  border-radius: 8px;
  transition: all 1s ease;
  z-index: -2; // i added a z-index of -2
}
Result
so we are going to do the same thing for the after pseudo element
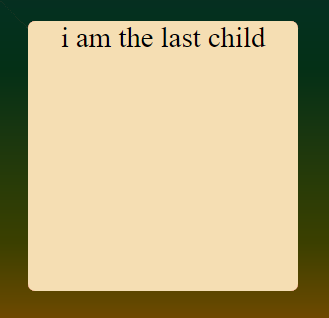
Using after pseudo element to Add a content after an element
With the idea we got from the previous one (“before pseudo element”),
we can just add the css straight up as follows
CSS
.parent::after {
content: 'i am the last child';
width: 100%;
height: 100%;
text-align: center;
position: absolute;
background-color: wheat;
top: -5%;
left: -5%;
border-radius: 8px;
z-index: -1;
transition: all 1s ease;
}
Normally, it will appear after the main element, but we are controlling it with z-index.
So your result will be like what’s shown below
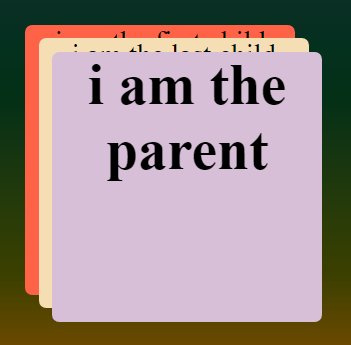
So at the end of the day, this is what we get.
And just to spice things up, we can add some kind of hover effect and it will work just cool with the transition property already added.
css
.parent:hover::before,
.parent:hover::after {
  top: 0;
  left: 0;
  z-index: 999;
}
when you hover on it, you should have something like what’s shown below;
You can check out other Css pseudo elements and how they are used here
This might not be the best example you will see on internet, and like i said earlier, there are more you can do with the Css pseudo element than this, but the main point here is to give you a good understanding of of how to work with before and after Css pseudo element.
Pingback: Css Pseudo Selectors/Classes - codeharis
Pingback: How to Create a Tooltip Using CSS - codeharis